Wednesday, July 31, 2013

Clothing Challenge #4


This picture shows the before and after in one shot....excuse the post shower look.  I really like this blouse because it has a vintage look to it....who knows maybe it is.  It actually fits as is but has an old lady feel to it, even being that silky type material they often wear.  I say "they" as if icky....ha ha!  No offense, just not my style, at least not yet.  Too long, too roomy, the long sleeves are too puffy and the only way to wear it with any shape is to tuck it in....which looses the effect of the pattern.  So I decided to shorten the sleeves and waist length, lose the collar and generally take it in all over.  No darts this time though because it would ruin the pattern.


First to remove the collar.  My trusty stitch picker.  Me and this thing have come along way together.  It was easy to just run it down the seam line on each side of the collar.


And there it is removed.  Notice I pinned the sleeve were I want to chop it off.


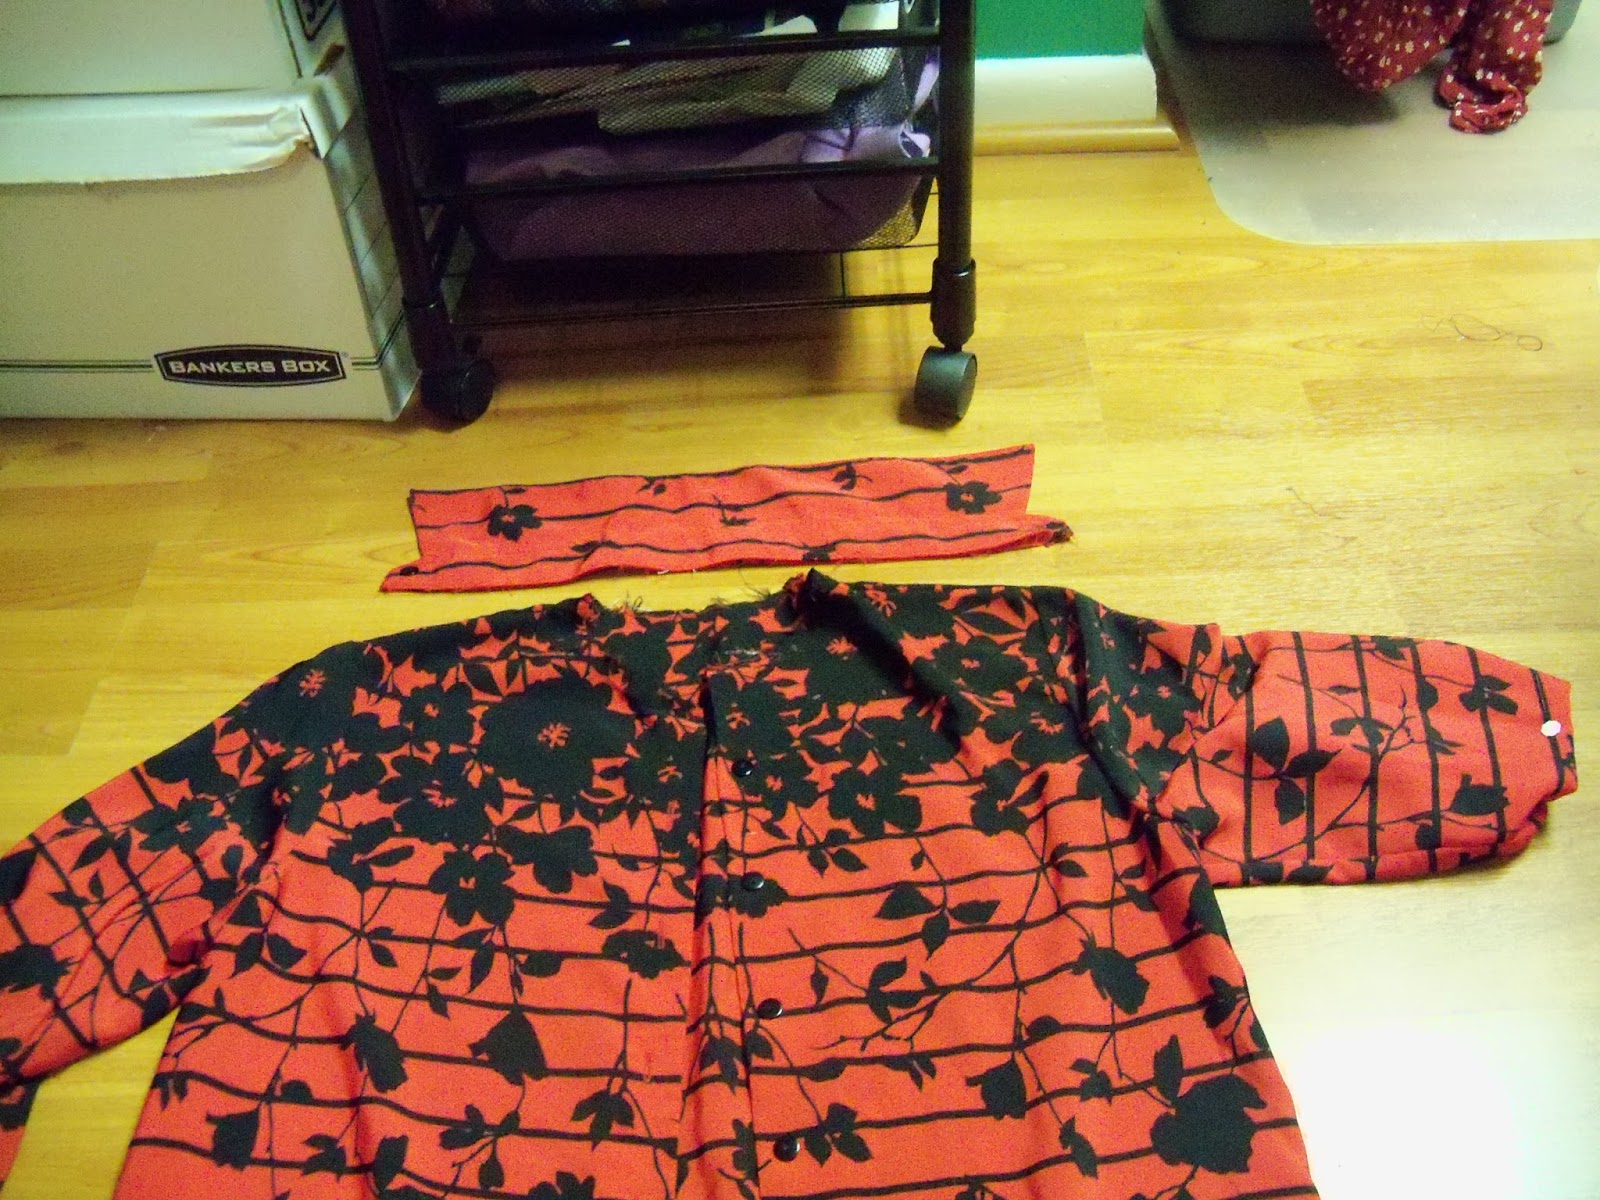
I decided to not go with a normal short sleeve since it will chop off the design.  At this quarter length, with my arms down, the arms are part of the "picture" of the blouse.  Too short and I lose that.


Of course I'll save those sleeves.....you never know.


Here it is minus the collar and sleeves.  I suck at photos.


Next to get rid on the extra length in the waist.  For a short person like me, all that length just makes me look short and squat..


The whole fit was a little loose so I proceeded to run a new stitch line around each arm seam, bringing in the shoulders and the underarm to be a little more fitted.  Smack me for not taking a photo of that.

MISSING PHOTO

Since I didn't want to take it in using darts, I ran a line up each side, slowly tapering in toward the bottom.  I couldn't come it too far at the bust part because I didn't want to have to undo and reconnect the arm pit.  Since I wasn't taking it in very far I was able to extend the side seam right up to the armpit and down the underside of the sleeve.  Too far in under the arm and it would have made it hard to lift my arms without undoing the sleeves and reattaching them.  Call me lucky!  I could have cut away the excess fabric, but I didn't feel like this was too much to just leave and it is already nicely finished.  Taking it in any further would have made it bulky though.


It has a nicer fit with the new seam lines.


I played around with the neckline, tucking it under at various degrees until I was satisfied with this.


So I cut the excess away, leaving enough to turn under for the cover stitch.


I want it to V right above the button, so I left that seam allowance large knowing that it has to be turned under for the cover stitch and I need room to get past that button without removing it.  Hey, I try to be efficient.


 And here it is with the cover stitch in place.


 I used the cover stitch to finish every edge....the neck, the sleeves and the bottom.  Here is what a cover stitch looks like....basically what you see on the bottom on any t-shirt.


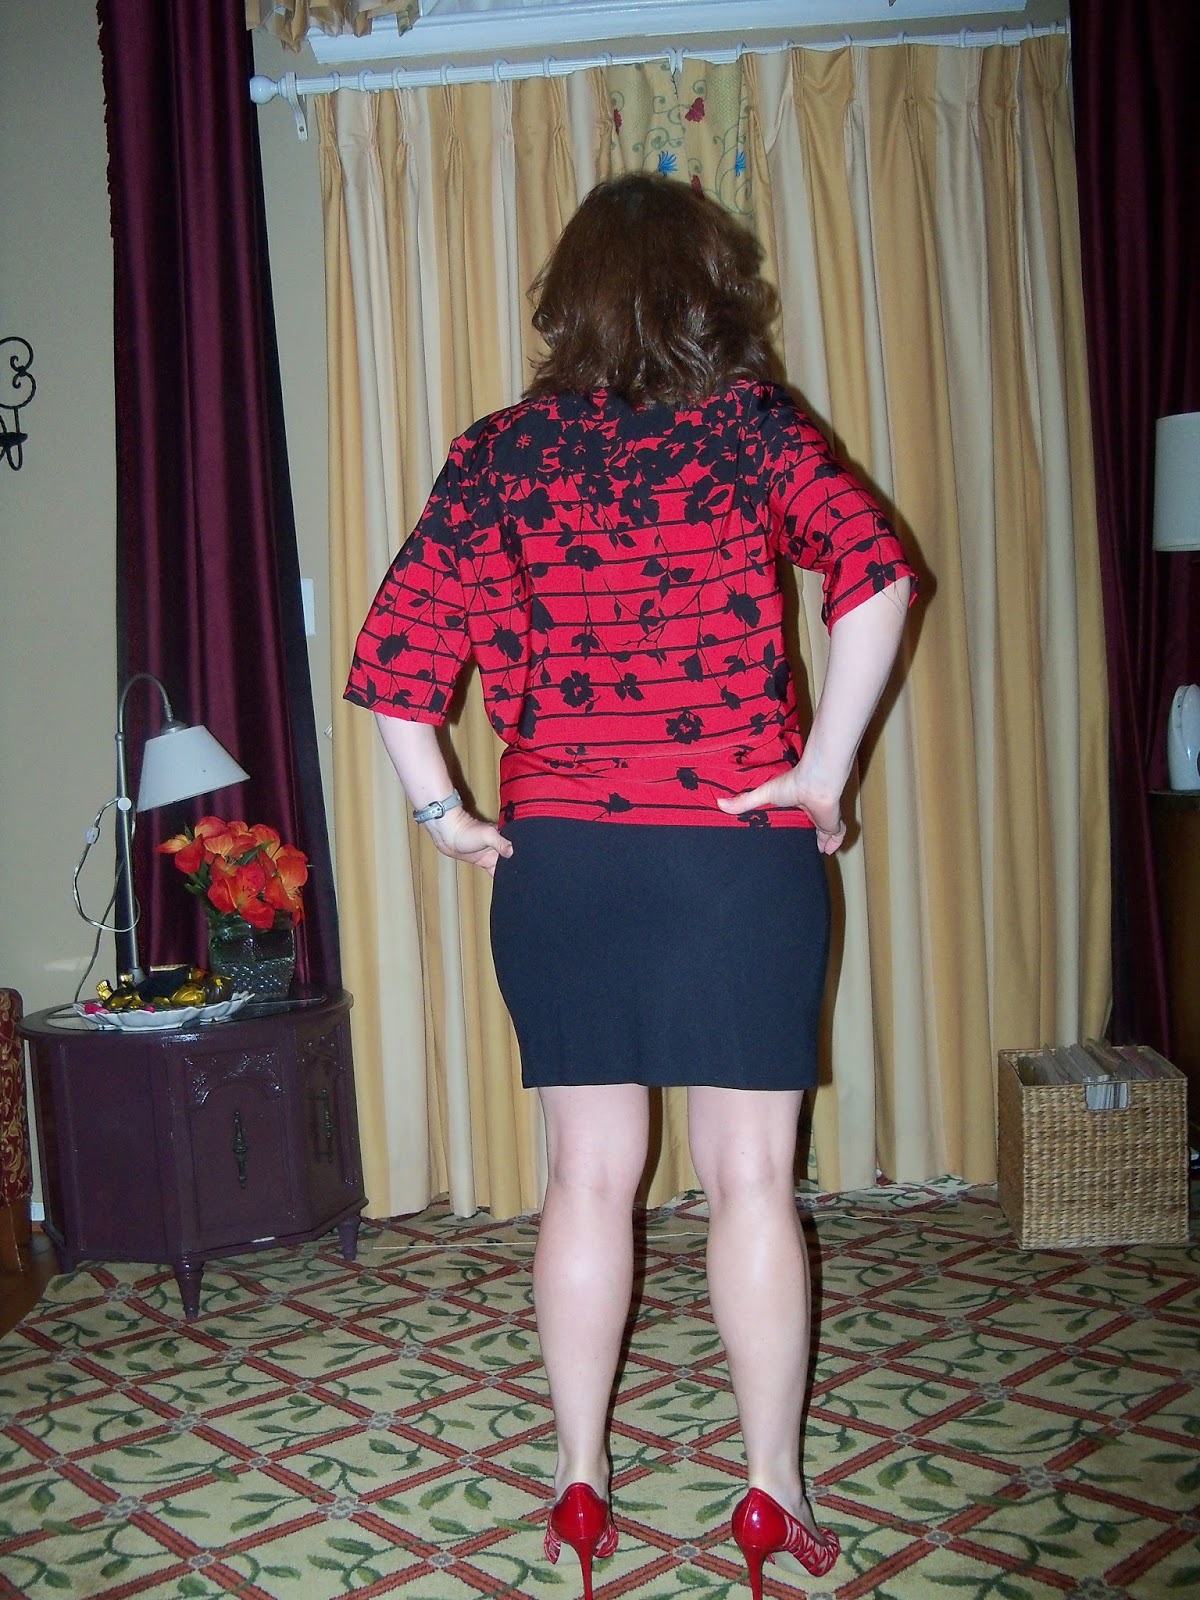
And here is the final product.  Much better I think!


 In case you are wondering about my workout clothes in every photo, I work out at night, and typically sew for a while as I cool down and wind down before I can sleep.  I don't sleep very much.....I'll do that when I'm dead. :)


Now ask me later how long I wore these shoes at work?  Lets just say, I packed the trusty flat sandels in my purse just in case.   :)

Tuesday, July 30, 2013

A hot mess!


What do you have when two kids share a room - boy/girl.  A HOT MESS!


She is a princess and has the girly stuff.


He has to counteract the frills with anything boy, Angry Birds, Spiderman, Cars, you name it.....all in its primary color glory.  His window is a purple/blue ombre panel.  You really can't see it in the photo due to the sunlight.


Her window gets the girly treatment.  Purple panels and a "skirt" topper.


She gets a killer whale covered cork board for her jewelry.


And he gets one to match, for his "non-jewelry".


His closet gets wallpapered with scrapbook paper in animal prints, since he IS a boy.


 Her closet is still on the to-do list.....  with all those waterfall furniture pieces that I still need to finish.


Can you see why I said a HOT MESS?  Scroll back through those photos and let me know what my color scheme is, when you figure it out.  IMPOSSIBLE!


Monday, July 29, 2013

Side table save


This will be a quick post.  This side table was another dumpster find.  Pitiful but a sturdy piece.  


Notice another one of those "read in bed pillow thingys" on the wicker love seat.  LOVE those things.  Sadly that wicker love seat, which was a Craigslist buy, had to go.  Someone at the thriftstore probably got very excited that day.


A little oops paint converted to chalk paint and then a little dry brushing of stain to give it some depth....and MMMMMMWWWWWWAAAAAAA!  Cute as a button.


Hey!  Do you see how my bedside lamp has those plug ins and phone jack on the front side, like you'd see in a hotel?  Well that it because these lamps are from the hotel resell place I love to shop at.  We don't use the phone jack  but the plug ins are awesome, just like you'd use in a hotel to charge your Kindle, phone, plug in a clock, etc.  Why aren't they standard on all lamps?  Anyway, you've seen lots of items from the hotel store in my posts....from the "rugs" that were hotel carpet, to the lamps, to the office chairs, the occasional chairs, the living room curtains WITH blackout fabric, the huge living room mirror.......it is totally worth is to check them out.   All super cheap!  I haven't been in a while, maybe I'll stop in.

Sunday, July 28, 2013

The fixings


You may have noticed that my bed does not include the usual pillow arrangements that you would expect of a fabric-ista.  The pillow-shams, neck-rolls, the pretty designer squares.  Well, it is quiet simple, I get tired of kicking them around on the floor.  The bed is seldom made (there, my secret is out) so they would be shoved in a corner somewhere or walked on by the kids anyway.  


I used to have them, years ago, but you live and you learn.  We actually use these things to read in bed.  Feel free to comment if you know what they are called.  We have two of them and they live on the bed or here on top of the dog crate.  I've been thinking of recovering them to match the room decor and keeping them permanently on the bed.  Mine lives there anyway, I am short so I just scooch down below it when I am done reading.  I love that thing!  So much more supportive than a pillow.  And yes I got both together at a the same time, a matching set, perfect condition (looked unused), at the thriftstore.  Those red stacking boxes?  Thiftstore.  I know, kick me.


SOOO, on to the bed skirt.

So you are probably noticing a tonal effect on the silky skirt, right?  Sort of  looks green but sort of looks gold too?  Fancy fabric?  Wrong.  Sun faded fabric? Right.


I found this huge piece of heavy satin (real or not? IDK)  at the thriftstore that someone had basically folded in half  and sewn a rod pocket in, to make a LONG window topper (effectively lining it with itself).  Must have been one huge window.....or maybe an expanse of windows across a wall.  Anyway, it was sun faded but I figure that there was so much of it, I'd figure something out for it.


After stitch picking to remove the rod pocket thread, I slit it down the crease, basically "un-doubling" it.....at the same time giving me TWICE as much length as I had before.  Any time a fabric-ista sees that much length of fabric, the first thing we think of is RUFFLES. Now there is a way to measure to know how much fabric you need for various fullness's of ruffles but I had so much fabric, I didn't even bother.  Besides, it is fun to live on the edge.   

After measuring and cutting to the depth I needed, I ran the bottom edge through the serger on a rolled hem.  Then I ran the top edge through the serger on a four  thread overlook.  Then I ran that edge through my sewing machine with the ruffler foot.  Then I attached the ruffled product to a white thriftstore sheet sized to the bed. WALA!


I also needed a KING size bedspread.  I only had a QUEEN size duvet.  I also had a twin size bed skirt in those perfectly matched stripes that you see there.  You can see where this is going.


After cutting the bed skirt fabric in the right size strips, I serged the raw edge and attached it with the sewing machine to the edge of the duvet.  I could have attached it with the serger but didn't want the knife to cut the duvet in case I want to use it later for another project.  I didn't even have to hem it since it was already hemmed.


As far as the curtains go, there is not much to say about those.  The topper is an oval tablecloth that I wacked in half, added trim to, and sewed in a rod pocket.   The yellow behind that was a designer fabric that I hemmed and sewed a rod pocket into.  The light gold behind that is a lined retail pair of curtains that I decided to use for privacy and sun blockage.  I didn't want complete blackout but some blockage.  Nothing fancy at all, just lots of fabric.  The tiebacks are just fabric leftovers from an old project.


Saturday, July 27, 2013

Master Bedroom


Out with the dark heavy drapes and in with the new lighter colors.  This window treatment is a combination of thriftstore curtains/fabric/tablecloth that just worked together.  I basically just used any shade of gold or yellow I had hoarded away.

Here is the link to a previous post so you can check out the before....since I reference "previous" a lot.


You might have noticed that we got a new KING size bed, which meant a new king size bed spread and all the other fixings.  Well obviously I worked all that out, so we will discuss it in the next post.  We bought the mattress/box springs with nothing else.  It sat on the floor for a couple of months until a co-worker mentioned that she was buying a new bedroom suite and no longer needed her bed frame.  SCORE!


The "rug" is a piece of carpet I bought at the hotel resale store for $25 and it inspired all the colors in the room.


The rug is how I got away with this fabric in the frame over the bed....and I'm still not sure if it really works.  It was some type of ethic gown thingy at the thriftstore.  Anyway I like to look at it, whether it truly works or not.  And beside the kids are getting a little to old for the naked folks we had as art before.  They started asking if it was me in the art and "that doesn't look like Daddy"......Daddy shaves his head bald :)


Now about that headboard....my friend from work only gave me the bed frame.  That headboard is another case of wanting something and lo and behold, I find it sitting by the dumpster.  Walking the dog....again....and there it was.  It was the end of the month and the apartment complex next door was likely going through its end of the month move-outs.  Most likely the person ran out of room in their moving vehicle because there wasn't a thing wrong with this headboard.


And how about that little side table?  Dumpster find.  Another post. Makes you SICK, don't it!


Only a little switch up on the closets, actually using the same fabric that was used on the previous curtains.  And going with dark brown curtains on the closet doors.


Sorry about that blurry picture.  The real estate agent said I should put the bifold doors back on for showing......boring.


A new piece of fabric in this frame pulls the chocolate from the closet curtains across the room.


Recognize anything from a previous post?  The flower pot from the dumpster find.


My swag chandelier finally got a plug-end attached, thanks to Daddy.


And there's another one.


In my next post, I'll explain why my bed "fixings" aren't as fancy as you might have expected from a fabric-ista like myself.  Notice how there were no pillow shams or neck-rolls?